Getting started#
New to HelloTriangle? Great — you’re in the right place! This section is designed to get you up and running quickly, even if you don’t have much (or any) experience with Python or 3D modeling.
HelloTriangle is a cloud-based platform that empowers engineers, researchers, and curious minds to work with 3D models in a simple and collaborative way. With just a few lines of Python, you can create, edit, and analyse 3D models directly in your browser. Once your model is ready, you can share interactive 3D visualizations with others via a simple link.
So, let’s dive in and draw your first triangle! 🎉
What is a mesh?#
Before we start drawing, let’s take a look at the core structure HelloTriangle uses to represent 3D models: the mesh.
A mesh describes a shape using simple building blocks that, together, form a complete object.
At its core, a mesh consists of:
Nodes (also called points or vertices) that sit in 3D space, each defined by its
(x, y, z)coordinates.Elements that connect these nodes or points into meaningful shapes, such as lines, triangles, or cubes.
By combining many small elements, we can represent very complex shapes — from a simple triangle to a detailed 3D model of a human organ.
Examples:
A triangle mesh is made by connecting points into triangles that form a surface.
A hexahedral mesh is made by grouping points into cubes, filling up a volume.
HelloTriangle supports all these kinds of meshes: points (0D), lines (1D), surfaces (2D), and full 3D volumes.
Hello Triangle!#
The name HelloTriangle is inspired by the famous “Hello World” example that many use for their first programming experience. In HelloTriangle, users also program—but the results are 3D models. So, your first “hello world” experience is drawing a simple triangle.
Here’s how to do this:
points = [[0.0, 0.0, 0.0],
          [1.0, 0.0, 0.0],
          [0.0, 1.0, 0.0]]
elements = [[0, 1, 2]]
triangle_mesh = Mesh(points, elements)
draw(triangle_mesh, name='triangle')
What happens here?
The
pointslist contains thex, y, zcoordinates of the three triangle corners.The
elementslist specifies how points are connected. In this case it has a single entry[0, 1, 2], meaning connect point 0, point 1, and point 2 into one element.
Note
Python counts from 0, so node 0 in elements corresponds to the first point [0.0, 0.0, 0.0].

Hello Triangle! 😊#
Let’s now create a mesh with two triangles:
points = [[0.0, 0.0, 0.0],
          [1.0, 0.0, 0.0],
          [0.0, 1.0, 0.0],
          [1.0, 1.0, 0.0]]
elements = [[0, 1, 2],[1, 3, 2]]
triangle_mesh2 = Mesh(points, elements)
draw(triangle_mesh2, name='triangles')
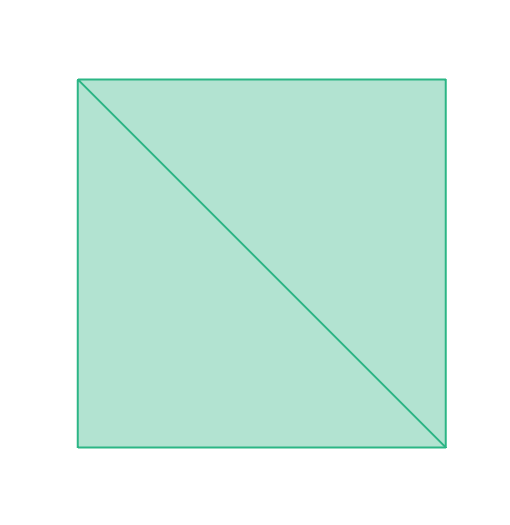
Mesh composed of two triangular elements. The edges have been highlighted using the Visualization Settings panel in the online viewer.#
Note
Nodes 0 and 1 are re-used by the second element. Sharing nodes among elements allows for more compact storage of large meshes.
Basic shapes#
When creating larger models, specifying every single coordinate manually would quickly become impossible. HelloTriangle provides a library of basic shapes that you can use in your scripts.
Some examples of available shapes include:
You can create a shape with a single line of code. For example, to create a circle:
my_circle = shapes.circle()
Once created, you can draw it:
draw(my_circle, name="my_circle", color="black")

Circle (line elements)#
👉 For an overview of all the available basic meshes, see shapes.
Element types and mesh inspection#
HelloTriangle supports different types of meshes. For example, a circle can either be a contour composed of 2-node line elements or a filled circle made of 3-node triangular elements:
my_circle_triangles = shapes.circle(eltype='tri3')
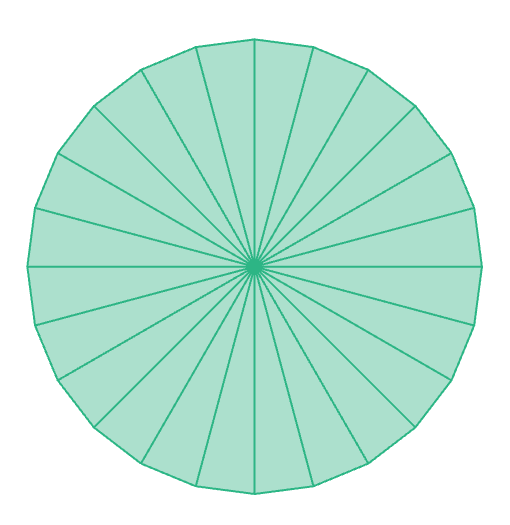
Circle (triangle elements)#
In the previous section, when we created a circle without specifying eltype,
the default element type was used (line2 for circle()).
Tip
Frequently use print(my_mesh) to inspect the mesh type, number of points, elements, etc.
Using draw() at intermediate steps is also very helpful to visualize what your script produces.
Example of inspecting the filled circle mesh using a print statement:
print(my_circle_triangles)
This outputs:
Mesh: n_nodes: 25, n_elems: 24, plexitude: 3, level: 2, eltype: tri3
  BBox: [-1. -1.  0.], [1. 1. 0.]
  Size: [2. 2. 0.]
  Length: 6.2652569  Area: 3.1058285
Here’s what the different parts mean:
n_nodes = 25 → the number of unique points (nodes) in the mesh.
n_elems = 24 → the number of elements (here: triangles).
plexitude = 3 → the number of nodes per element (triangles use 3).
level = 2 → the dimensionality of the elements (2 = surface mesh).
eltype = tri3 → the element type, in this case 3-node triangles.
BBox = [-1. -1. 0.], [1. 1. 0.] → the bounding box of the mesh, given as the minimum and maximum xyz coordinates.
Size = [2. 2. 0.] → the overall size of the mesh in x, y, z directions.
Length = 6.2652569 → the total length of the free (outer) border of the mesh.
Area = 3.1058285 → the total surface area covered by the triangles.
Here’s another example, this time with four nodes:
points = [[0.0, 0.0, 0.0],
          [1.0, 0.0, 0.0],
          [1.0, 1.0, 0.0],
          [0.0, 1.0, 0.0]]
elements = [[0, 1, 2, 3]]
quad_mesh = Mesh(points, elements)
print(quad_mesh.eltype)
This will output ‘quad4’, since the default element type for 4 nodes per element is a quadrilateral.
If you want a tetrahedral element instead (also 4 nodes, but a 3D element rather than a 2D quadrilateral), you need to explicitly set the element type when creating the mesh:
tet_mesh = Mesh(points, elements, eltype='tet4')
Note that this will create a degenerate tetrahedral element, because all 4 nodes lie in the XY plane. In practice, tetrahedral elements should have non-coplanar nodes to be valid.
Tip
Want to explore further? Check out the Element types section of the User Guide. It includes an overview of all supported element types and a handy table of default types by number of nodes.
Drawing objects#
You’ve already seen the draw() function in action — it’s how your meshes and points show up in the 3D viewer.
You can give each object a name and a color:
draw(my_mesh, name="mesh", color="red")
draw(my_coords, name="points", color="black")
Tip
The color parameter sets the same color on all representations of the mesh.
For independent control over faces, edges, and points — or properties like opacity and
line width — use the style parameter instead:
draw(my_mesh, name="mesh", style={
    "faces": {"color": "#00ff00", "opacity": 0.8},
    "lines": {"color": "#000000", "width": 2.0}
})
You can also configure scene-level settings like background color and camera type:
set_background("#1a1a1a")
set_camera({"type": "perspective"})
draw(my_mesh, name="mesh", color="#00d9ff")
That’s all you need to get started. 😊
👉 For complete styling options and scene configuration, check out the Drawing objects section of the user guide.
Note
If you do not specify a name, a random one will be assigned automatically.
The name will appear in the Visualization Settings panel of the GUI.
Importing & exporting#
In HelloTriangle you don’t always have to start from scratch — you can also bring in meshes created in other software, and of course export your own creations when you’re done.
Importing a mesh
First, upload the mesh file (e.g. STL, OBJ, VTK) to the online HelloTriangle platform. Once uploaded, you can load it in your script like this:
mymesh = load("mymesh.stl")
draw(mymesh)
This gives you a Mesh object that you can work with just like the shapes you’ve created from scratch.
Exporting a mesh
When you’ve built or modified a mesh, you can save it back to a file:
save(mymesh, "mymesh.vtk")
The file will then be available for download from the platform.
👉 For more details, e.g. about supported file formats, see the Importing and exporting section of the user guide.
Example: Building a 3D model#
So far we’ve drawn simple lines and triangles. Let’s now build a full 3D model — step by step. As you follow along you’ll see why it’s useful to draw intermediate steps: plotting as you go helps catch mistakes early and makes the process much more enjoyable.
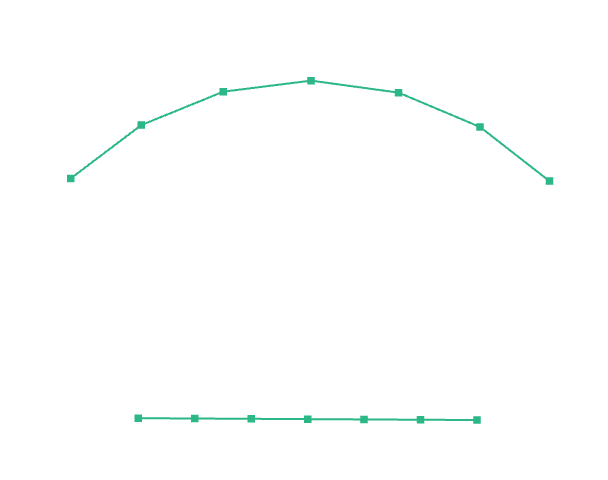
Step 1: Create an arc
Start with a 90° arc in the XY plane (center at the origin). The arc begins at
[1.0, 0.0, 0.0] and ends at [0.0, 1.0, 0.0], as you can see from the output of the print statement.
Note that the report() allows you to get more information as compared to simply using print(arc).
We divide the arc into 6 straight line2 elements.
arc = shapes.arc(angle=90.0, div=6)
print(arc.report(full=True))
draw(arc, name="arc")
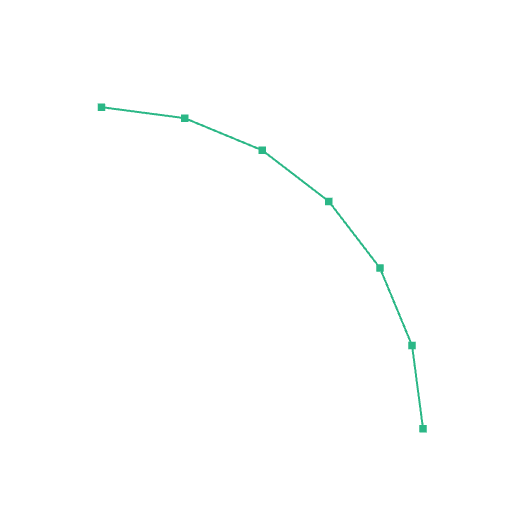
A 90° arc composed of 6 line elements. Nodes were highlighted in the viewer.#
The output of the print statement:
Mesh: n_nodes: 7, n_elems: 6, plexitude: 2, level: 1, eltype: line2
  BBox: [6.123234e-17 0.000000e+00 0.000000e+00], [1. 1. 0.]
  Size: [1. 1. 0.]
  Length: 1.5663142
  Coords: [[1.0000000e+00 0.0000000e+00 0.0000000e+00]
           [9.6592581e-01 2.5881904e-01 0.0000000e+00]
           [8.6602539e-01 5.0000000e-01 0.0000000e+00]
           [7.0710677e-01 7.0710677e-01 0.0000000e+00]
           [5.0000000e-01 8.6602539e-01 0.0000000e+00]
           [2.5881904e-01 9.6592581e-01 0.0000000e+00]
           [6.1232343e-17 1.0000000e+00 0.0000000e+00]]
  Elems: [[0 1]
          [1 2]
          [2 3]
          [3 4]
          [4 5]
          [5 6]]
Step 2: Rotate the arc
Rotate the arc 45° around the Z axis and draw the result.
arc = arc.rotate_z(45.0)
draw(arc, name="arc_rotated")
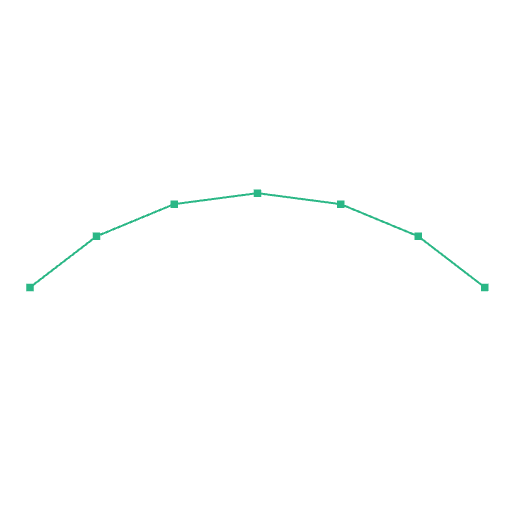
The arc, rotated around the Z-axis.#
Step 3: Add a line segment
Create a line segment between [0.5, 0.0, 0.0] and [-0.5, 0.0, 0.0], divided in 6 elements,
and draw it together with the rotated arc.
line = shapes.line_segment(p1=[0.5, 0.0, 0.0],
                           p2=[-0.5, 0.0, 0.0],
                           div=6)
draw(line, name="line")
draw(arc, name="arc_rotated")   # redraw rotated arc so both are visible
The line segment and rotated arc together. Individual nodes are highlighted.#
Step 4: Create a quadrilateral surface mesh
Connect the line and the arc into a quad surface mesh. We set div=4 to control the
number of divisions between the two input meshes.
quad = Mesh.connect([line, arc], div=4)
draw(quad, name="quad_surface")
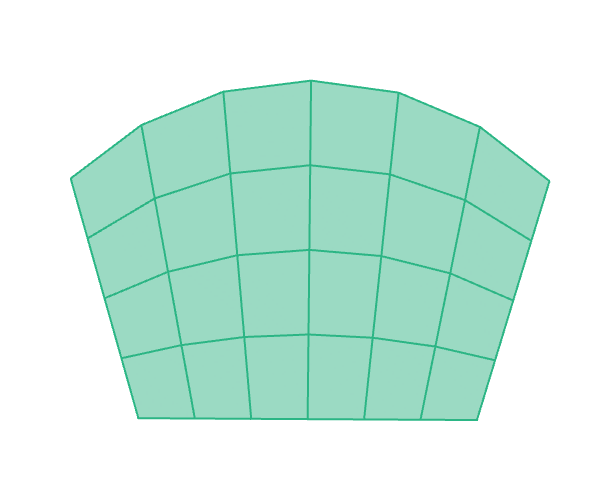
Quadrilateral mesh formed by connecting the line and the arc.#
Step 5: Revolve to a 3D hexahedral mesh
First translate over 2.0 in the Y-direction, and then revolve the quadrilateral surface around axis=0 (i.e. X-axis) into a 3D hexahedral mesh.
The argument 24 defines the number of circumferential steps.
hex = quad.translate([0.0, 2.0, 0.0]).revolve(24, axis=0)
draw(hex, name="hex_mesh")
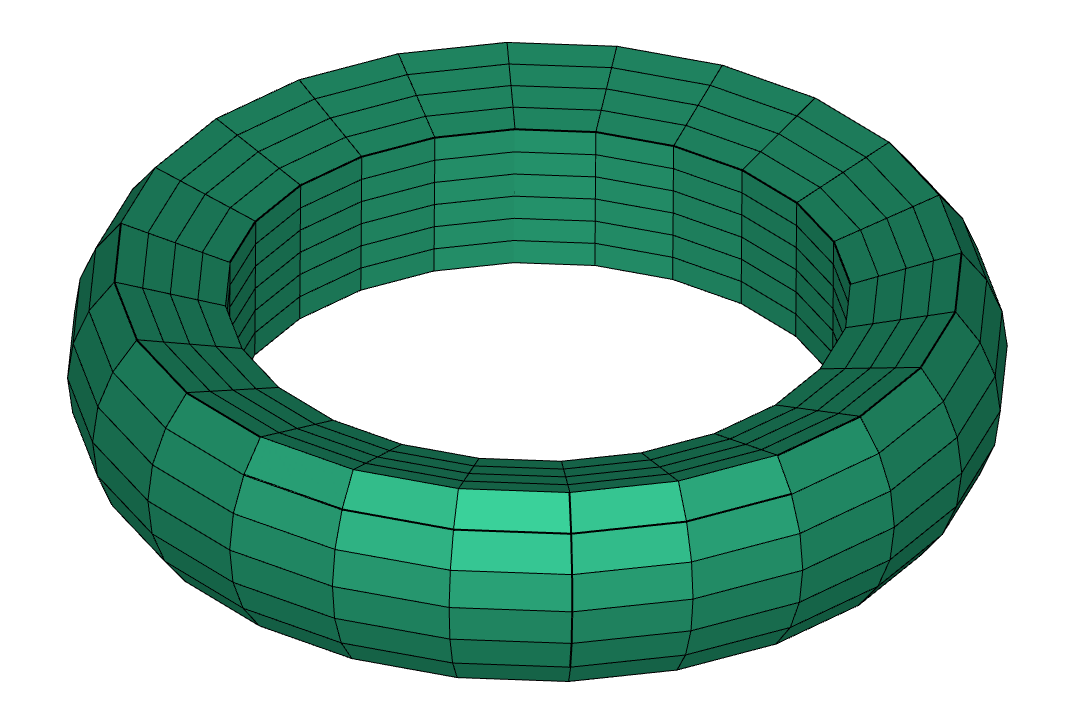
3D model made of hexahedral elements (hex8). 🎉#
Step 6: Back to surfaces (for export)
To obtain a surface mesh suitable for exporting (e.g. STL), first extract the border of the hex mesh (the border will be a quad mesh), then convert quads to triangles:
quad_border = hex.border_mesh()
tri_border = quad_border.convert("tri3")
draw(tri_border, name="tri_border")
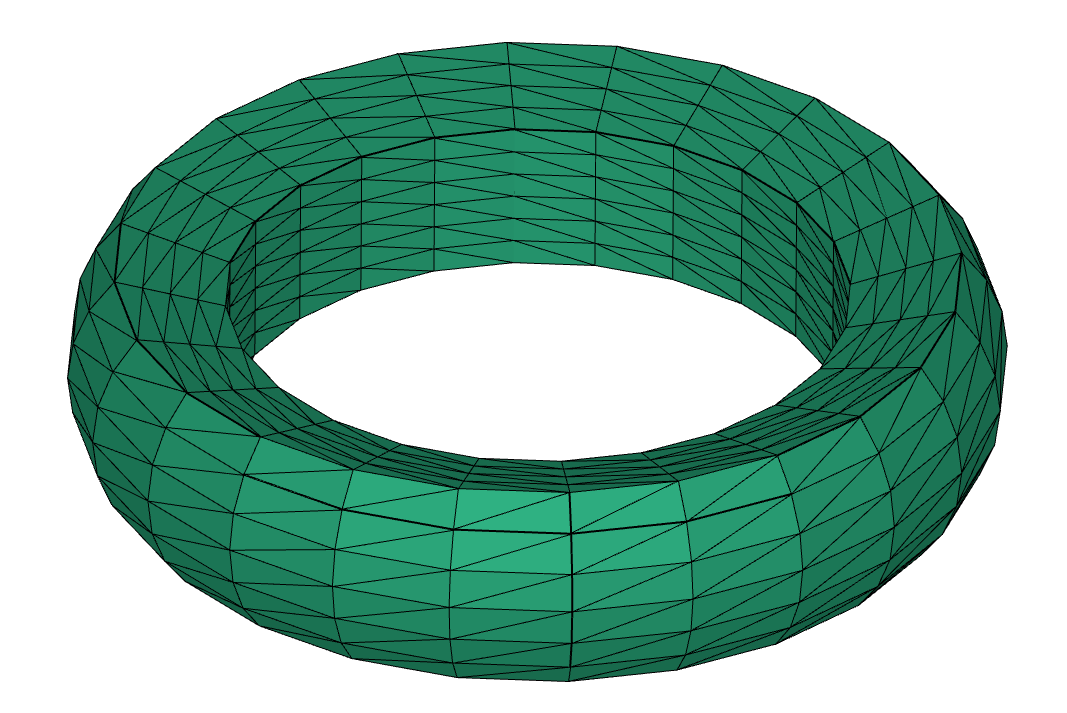
Surface mesh extracted from the hex model and converted to triangles.#
Step 7: Exporting
Save your meshes for use in other tools:
save(hex, "hex_mesh.inp")           # export hexahedral mesh (Abaqus .inp)
save(tri_border, "tri_border.stl")  # export triangular surface mesh (.stl)
Full example (copy-paste)
Here’s the full sequence you can copy-paste and run (you can insert additional draw calls after the different steps):
arc = shapes.arc(angle=90.0, div=6)
arc = arc.rotate_z(45.0)

line = shapes.line_segment(p1=[0.5, 0.0, 0.0],
                           p2=[-0.5, 0.0, 0.0],
                           div=6)

quad = Mesh.connect([line, arc], div=4)

hex = quad.translate([0.0, 2.0, 0.0]).revolve(24, axis=0)
draw(hex, name='hex')

quad_border = hex.border_mesh()
tri_border = quad_border.convert("tri3")

save(hex, "hex_mesh.inp")
save(tri_border, "tri_border.stl")
Tip
Notice how just a few lines of code are enough to create a fully parametric 3D mesh model. Try it out! Change the angles, lengths, or the number of divisions and see how the model adapts. It’s a great way to experiment, explore, and have fun while learning HelloTriangle.
Tip
Draw intermediate results frequently (
draw(...)) — it helps you catch mistakes early.Use
print(...)to inspect object details.In the viewer you can inspect and highlight points/edges/faces using the Visualization Settings panel to better understand connectivity.
Next steps#
Congratulations! 🎉 You’ve made it through the basics and learned how to create a 3D model in HelloTriangle.
Now it’s time to get some hands-on experience. Here are some suggested next steps:
Try out the examples library: Explore ready-to-run scripts and models in the HelloTriangle examples library. Pick one that interests you and experiment by modifying it — this is one of the fastest ways to learn.
Dive deeper into the API: Whenever you want to know more about available functions and methods, check out the API reference.
Explore the User Guide: For guidance on specific topics such as element types, drawing objects, or importing/exporting meshes, consult the User Guide.
Reach out if you need help: If you have questions or want to share your feedback, feel free to reach out to us via the contact form on the HelloTriangle website.
Good luck, and enjoy your journey in 3D modeling. 🚀